
on this hop are showing you a BACK TO SCHOOL project using the
Fabulous and versatile eCraft.
Contest ends 8/22/2011 at 6 AM PDT time...any post after don't count! But check back on the 5th of September for another chance!!!
If you just arrived here from Carley Carter’s blog then you are in the right place. If you just happened upon my blog please start at the beginning over at Raven’s Blog http://love4stamps.blogspot.com/. That way you will be able to see all of the amazing projects and you will have more ways to win.
Here is my project for the hop!

I am a sewing junkie and love quilt blocks and mug rugs. This is my project! I am celebrating Back to School for my friend! I am so excited about all of the wonderful projects that the eCraft is helping me make!
Here is a list of all the designers on the hop in case you get lost
along the way.
Raven Baca http://love4stamps.blogspot.com/
Carley Carter http://the-real-icarley.blogspot.com/
Debi Tullier http://fabric-ecraft.blogspot.com/
Denise O'Connor http://purplepaperparadise.blogspot.com/
Erika Valdez http://www.craftysprouts.com/
Lyssa Zimmerman http://bornagaincrafter.blogspot.com/
Faith Freeman http://faithfulecreations.com/
KimberlyRae Forde http://kreationsbykimberlyrae.com/blog/
Rosa Ahrens http://www.for-micaela.blogspot.com/
Zeni Pradel http://www.scrappyzeni.blogspot.com/
Craftwell USA http://craftwellusa.com/
Okay so you probably want to know what you can win, right? As some of
you may have heard from this hop this amazing eCraft machine that we
are all using is created by CraftwellUSA.com. This company is really
amazing, their customer service is fabulous and the products are top
notch. Well when they heard about our hop they decided to giveaway
One eCraft to One lucky winner (color may vary).
1.) Please leave one comment here on my blog (Only one comment will be
qualify per person additional comments will not count.)
2.) Stop by eCraft’s facebook page http://www.facebook.com/ecraftbycraftwell to
see more awesome projects and tutorials.
3.) I would love it if you’d become a follower of my blog but it isn't necessary.
Remember, We are also having another blog hop on September 5th. ALL comments
left today and on the September 5th blog hop will be eligible to win
the eCraft so this will give you more chances to win. (1) One lucky
winner will be announced on Raven’s blog http://love4stamps.blogspot.com/ on September 10th. The winner will also be listed on the eCraft Facebook page http://www.facebook.com/ecraftbycraftwell (see why it’s a good idea to like eCrafts facebook
page ;)
All are welcome to hop, however the eCraft giveaway is only open to
U.S. entries. Thank you so much for your understanding.
Thanks for stopping! Your next blog is Denise O'Connor http://purplepaperparadise.blogspot.com/
I decided to make a quilt block, will probably become a mug rug, or a front tote panel. I am just excited to share how easy it is to cut fabric with an Ecraft machine. I love it so!
Here we go:
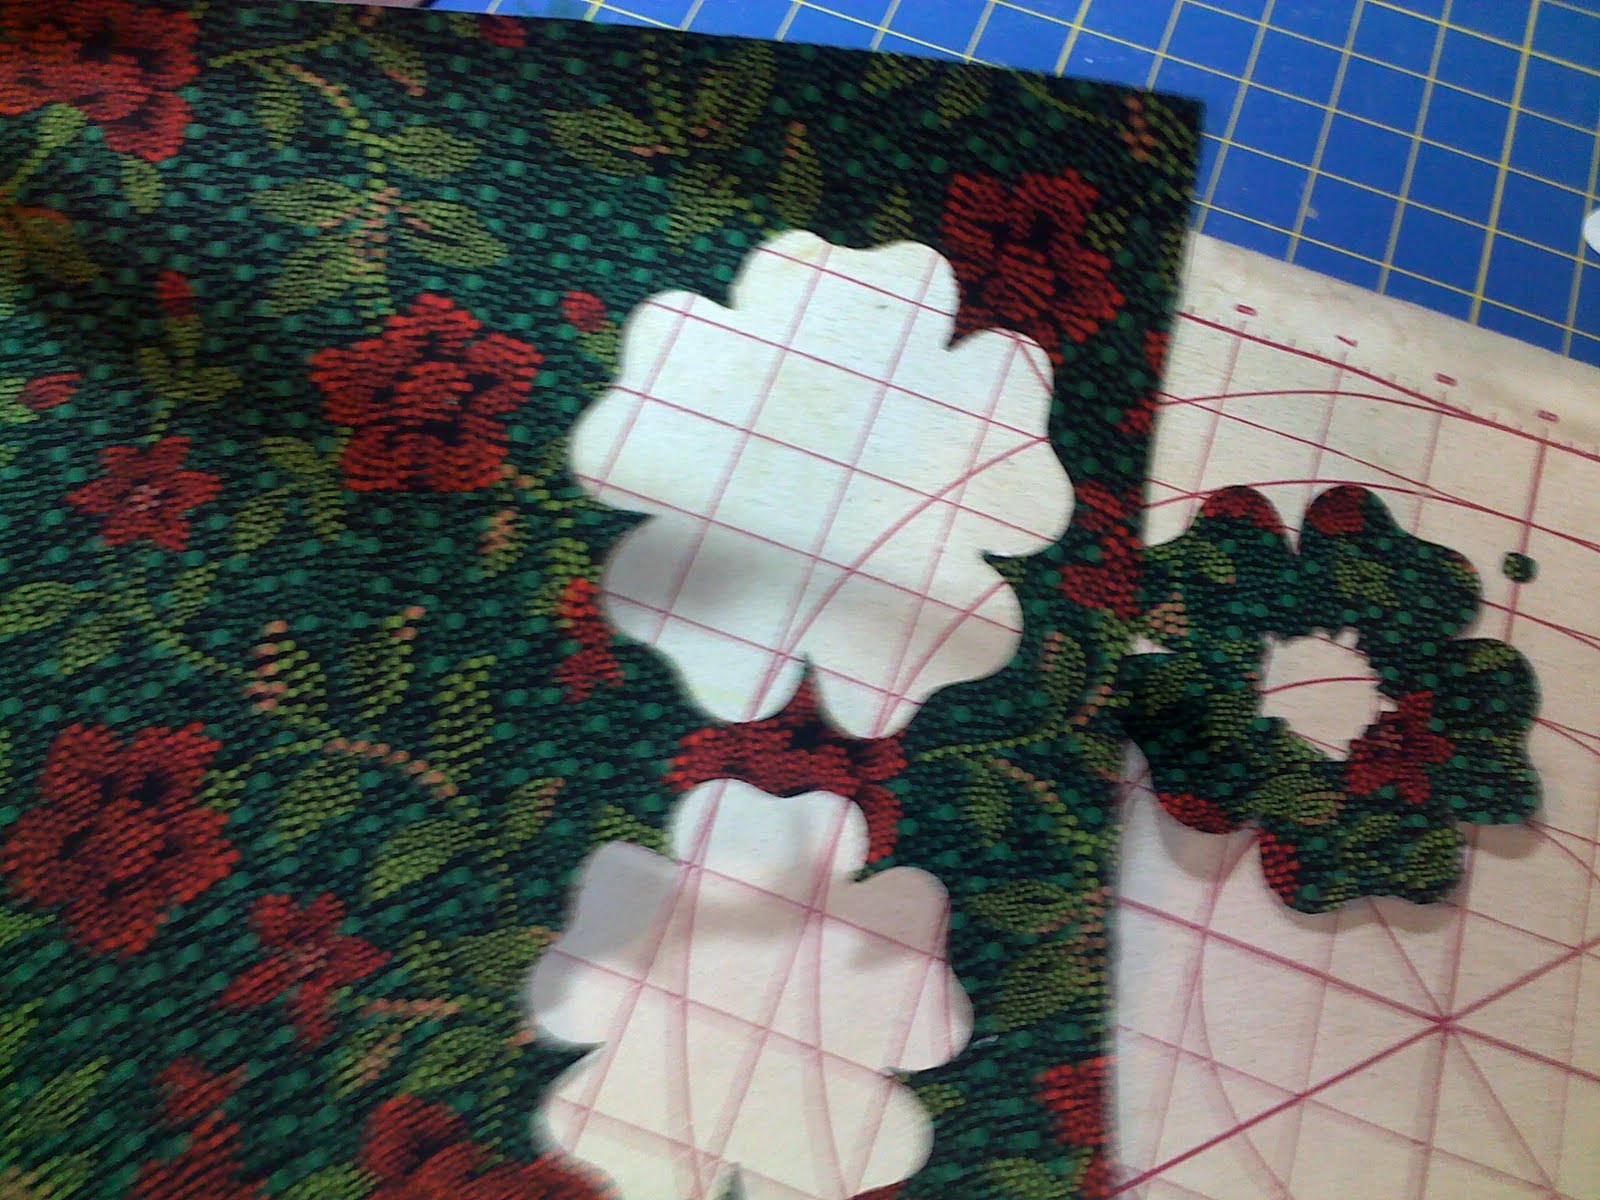
First I found that using my Ecraft was a joy to complete this project. I experimented with a new method for cutting fabric with the Ecraft. I used freezer paper and also "Heat-N-Bond" light to stabilize the fabric.
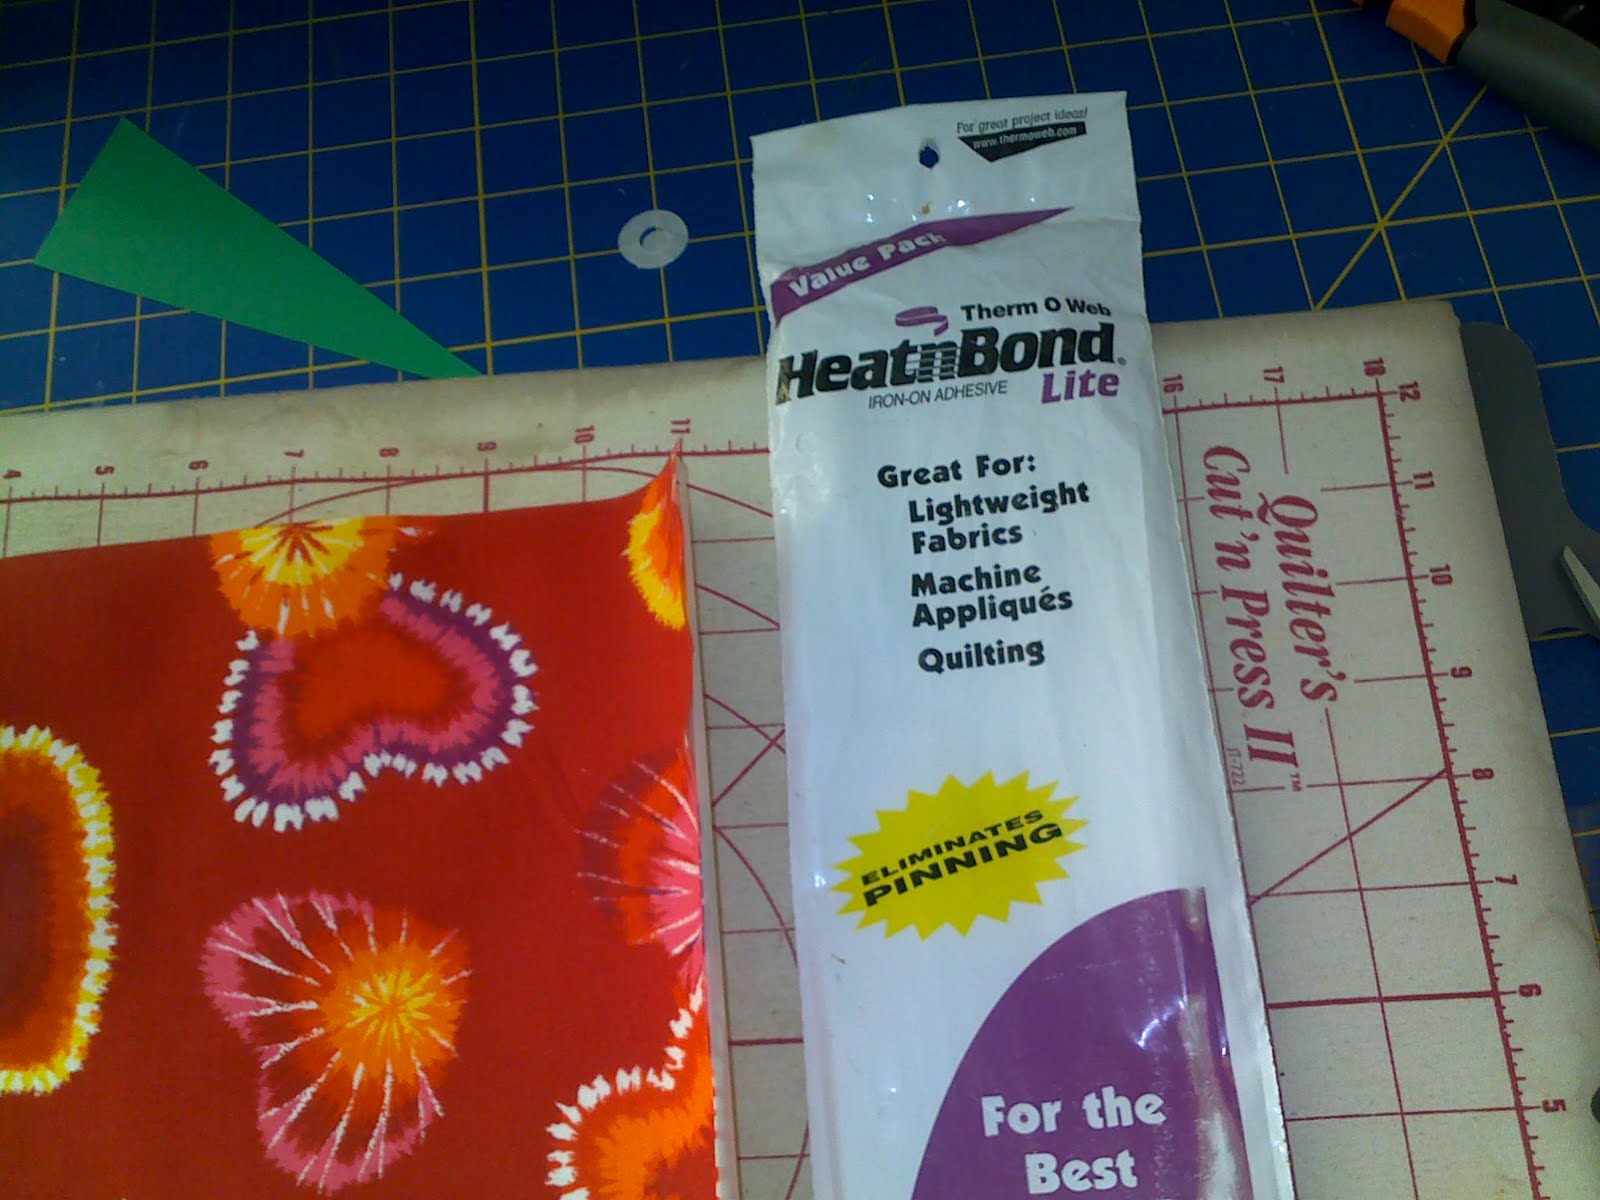


So now I apply it to both sides. Next I placed the pieces where I wanted them and then took out my mini iron and pressed the "Heat-N-Bond" items in place.


Then came the fun embellishment part. I used black thread to make the grill and also to frame the windows.

I forgot to mention that before I cut the items out that I used my drawing pens to see how the cuts would place on the material. The Ecraft has a pen that stays in place while the blade is also attached so that you can set it up in the SCAL program to only draw the item versus cutting it. That way you can see how to place your freezer paper encased material in the machine.
I then stipple stitched around the bus and the crayons. I love this stitch and get relaxed as I sew it.

I am very pleased with the outcome. If you would like more information please feel free to contact me.

Sneak preview of my next cut out for a cool design.
Also working on some Trick or Treat goodies..

Thank you for coming by!
Great patch. I love it, would love to learn to sew... it's on my list of things i have to learn. Thanks for sharing.
ReplyDeletepattig161 at yahoo dot com
Love it.. Thank you for the tutorial. You are sooo super talented.
ReplyDeleteWOW!! How cool is that!!! I had no clue the Ecraft "drew" as well.. Great tutorial!!
ReplyDeleteHugs,
Tanya
freddylswillima@windstream.net
Wow! What a cool project!
ReplyDelete-Emily
http://www.createserendipity.net
createserendipity@gmail.com
That's awesome!
ReplyDeletemichelegreen120 at gmail dot com
www.michelegreen.com
Wonderful project! I used to quilt a lot b4 baby. I love how I can "cross pollinate" my paper crafting and fabric crafting to get really neat projects. TFS! I hope to pull my machine and fabric out again someday:-) BTW I'm a new stalker:-)
ReplyDelete~Tammy
tammy dot schmitt at mac dot com
http://thepurplemuse.blogspot.com
that is so neat! I am really into quilting or should I say I would like to be into quilting but I don't have time for another hobby right now:-) You did a great job!
ReplyDeleteJessica
creativestamperspot @ gmail dot com
http://thecreativestamperspot.blogspot.com/
super cute project
ReplyDeleterosiemini@gmail.com
Wao this is so cool and awesome project!!! You did a wonderful project!!! Great job!!
ReplyDeleteKarla
kureab at hotmail dot com
Quilting is on my 'bucket list':-) Your project is wonderful and really does show the versatility of the machine - WOW! I am a new follower...
ReplyDeletejejaeb at cfl dot rr dot com
Very cute.
ReplyDeleteVinDeeLoo
vndlewis at rocketmail dot com
THis is such a great project! Love it
ReplyDeletex
Man o man I love it! I love the look of your blog too. My favorite colors. You have a great talent. TFS CallyAnn(new follower)
ReplyDeletehttp://callyanncraftycreations.blogspot.com
come on over
OMGosh!! You talented people!! Debi I am amazed at what you can do with that machine!!
ReplyDeletetransport7800@aol.com
http://mawmawsthoughts.blogspot.com/
follower
OMGOLLY such talent...you all really inspire me!
ReplyDeleteCathi Carpenter
ourfam@bellsouth.net
Very nicely thought out project! Thank you for sharing your awesome talent!
ReplyDeleteWOW! You have an amazing talent for fabric! Can't wait to see what you come up with for the next hop!
ReplyDeleteGreat Project! Can't wait to see the next one :)
ReplyDeleteKimberlyRae
http://kreationsbykimberlyrae.com/blog
WOW!!! What an awesome project and tutorial.
ReplyDeletewww.shortycreations.com
Your little quilt, block or mug rug (whatever it is) is adorable! Looks like you hand quilted it! I would so love to win that eCraft machine if it can do stuff like that. TFS!
ReplyDeleteAnniebee
anniebeescraftroom at gmail dot com
anniebeescraftroom.blogspot.com
love this!
ReplyDeletesweetlilscrapper.blogspot.com
sweetlilscrapper at hotmail dot ca
Wow! Super cool project!!! TFS
ReplyDeleteAwesome project, never thought to put the 2 together... thanks for the little tut.
ReplyDeleteI did all 3 requirements.
Hugs,
Staci
pmsm0412 at gmail dot com
I love your project. I am an ispiring quilter.
ReplyDeleteI have fulfilled all 3 requirements to win.
Kathy
Katsews at gmail dot com
I have seen the videos on cutting fabric by craftwell but your cuts are way more difficult. I had no idea the ecraft could do that!
ReplyDeleteStephanie K
cx500tc@aol.com
Wow, it never occurred to me to use my cutter to help with my sewing projects! Years ago I used to do small fairy tale applique quilts and this would have been an amazing help! Thanks for the fantastic ideas and the blog hop!
ReplyDeleteheather.abels at gmail dot com
You are such a talented crafter, and I am proud to call you friend. Can't wait to see this creation first hand.
ReplyDeleteWonderful information. I bought my ecraft to create applique' pieces for my quilting. I will certainly try the freezer paper on both sides. Thanks for the great inspiration.
ReplyDeleteThat is so great! Can't wait to see more! TFS!
ReplyDeleteJill
http://craftwithanangel.blogspot.com/
Thanks for the tutorial.
ReplyDeleteJudy
omipersians@yahoo.com
Seriously this is super awesome. You make it look so easy. I wish you were my neighbor and could teach me. LOL Great project.
ReplyDeleteThanks for being part of a hop that offers a chance to win an eCraft.
Smiles Sher
ShersL84bed@aol.com
Wow!!! I love your projects. Also, you directions are so detailed and very helpful. If I get an eCraft, I'll definitely try this out. TFS and scrappy hugs to you my friend.
ReplyDeleteChristel
http://onescrappinsista.blogspot.com
askscrappinsista (at) hotmail (dot) com
Amazing!!! I am new to eCraft and didn't know I could use it for quilting!!! I so hope I win a machine so I can start learning and show my grandchildren. (I do have 28 of them and 4 great grandchildren!!!!) Absolutely wonderful machine, oh I can't wait to tell everyone!!!
ReplyDeletervgrandma1@yahoo.com scrappiPat
What a WONDERFUL giveaway!!!
ReplyDeleteI have a cricut, but dont use it often because of always needing to deal with cleaning and buying new mats :/
I have also "liked" and commented the facebook page :)
Thank you for this opportunity!!! :)
Completely fabulous!!! Thanks for sharing how to cut material!!
ReplyDeleteYour block is darling! Great tutorial too!
ReplyDeleteThanks for the chance to win.
Ruthie :)
This machine is awesome! I so love the way it works with fabric. Great project!
ReplyDeleteHolly504main@yahoo.com