
I love creating and playing with all things crafty and anything that sews!!
SVGcuts
Tuesday, September 27, 2011
Craftwell: Design Team: Debi Tullier Week 2
Craftwell: Design Team: Debi Tullier Week 2: Design Star: Debi Tullier Liked Denise's cute Halloween door sign? Then you will like Debi's pillow tutorial! Debi has a way of making ...
Ecrafting "Home Decor" let's make a pillow!
I love designing pieces for my home and my friends' as well. Pillows are all the rage and so I decided to try my hand at a simple pillow design. If you can sew a line of straight stitches (it doesn't have to be ruler straight) you can make this pillow!!

The eCraft can use many forms of input for cutting. You can use the wonderful SD cards that eCraft has. You can even use your eCraft software to manipulate the images from the sd cards and send to be cut by your machine. Many don't know though about the online library of ready to download images at eCraft Central. I love using these images for making appliques. I even manipulate them so I can create "one of a kind" pieces! In this project I used photo corner number 32. I also used a looped piece, Embellishment number 1. I used the "Sure Cuts A Lot" software to mirror the image and to weld it to make a medallion. I also used the shadow function to produce the background.
Just for fun!!
 Back to the project at hand. I cut it out on my eCraft using the settings pressure setting was set at 3 and a half. So in between the 3 and the 4. My tab density was set at 0. Multi-cut was set at 0. I did use an image stabilizer the vegetable. I loaded the fabric through the front loading tray. My blade cap was on.

My pillow form was a fourteen by fourteen one so it was pretty easy to determine that a cut of fabric fifteen by fifteen would work for what I wanted. So I made my cut of base fabric. Then I folded the square in half and then opened it and folded it in half on the other side to form a center point. I also folded my shadow piece to center it on the pillow case front.
 Then I removed the backing and ironed my center piece on.
 My next step was determining placement of my "corner" embellishments. I tried it two ways. I used a chalk pencil mark the placement before I fused the applique down. You don't have to do this, you can "eyeball it" but I like the spacing that I got by measuring it.
 I then fused all of the pieces down. Next I cut the fabric for the back. I knew that I wanted a slit to be able to put the pillow in and take it out to use other covers. So really easy I cut my back piece as a rectangle fifteen inches by nineteen. I then cut it in half. I folded over one inch and stitch it down on both pieces. I then didn't worry about the placement I just matched up the other edges and it made an envelope for my pillow form.

I sewed around the whole piece and trimmed the edges. I turned the pillow case right side out and popped the pillow form in. I have a cute pillow that I can change as my mood and decor fits!

I hope you enjoyed my presentation! Look forward to next week! Please leave me comments, suggestions, and have a great week!

The eCraft can use many forms of input for cutting. You can use the wonderful SD cards that eCraft has. You can even use your eCraft software to manipulate the images from the sd cards and send to be cut by your machine. Many don't know though about the online library of ready to download images at eCraft Central. I love using these images for making appliques. I even manipulate them so I can create "one of a kind" pieces! In this project I used photo corner number 32. I also used a looped piece, Embellishment number 1. I used the "Sure Cuts A Lot" software to mirror the image and to weld it to make a medallion. I also used the shadow function to produce the background.
Just for fun!!


My pillow form was a fourteen by fourteen one so it was pretty easy to determine that a cut of fabric fifteen by fifteen would work for what I wanted. So I made my cut of base fabric. Then I folded the square in half and then opened it and folded it in half on the other side to form a center point. I also folded my shadow piece to center it on the pillow case front.


I sewed around the whole piece and trimmed the edges. I turned the pillow case right side out and popped the pillow form in. I have a cute pillow that I can change as my mood and decor fits!

I hope you enjoyed my presentation! Look forward to next week! Please leave me comments, suggestions, and have a great week!
Tuesday, September 20, 2011
Ecrafting "zigzag" (Missoni look a like design) Earrings
The world saw the wildness of design in the last few days. A designer who has made it quite large in several decades with his use of zig-zag lines has reappeared and is so hot!
Well I love his design, so simple but so appealing. I love earrings and the bigger the better.His design was just the thing I needed for some over the top earrings! These are my light to wear Chandelier style Earrings! You too can have some just follow some easy directions.

I decided to use my Fundamentals 1 SD card which came with my eCraft for a design that would work! I love this heart design and saw right away that the cut out would work with the heart as a topper for my earrings.
You can use any design that works for you. I also made up an image to use on fabric which I used for this project. Lets get started!
The first thing is to prepare your fabric for inkjet printing. I use a product called Bubble Jet Set 2000. It makes fabric (natural fabrics do best)able to be used in an inkjet printer. The image will remain and not run off of your item. I soak the cotton fabric in the Bubble Jet Set solution for five minutes and then after it is dry, it is then ironed on freezer paper cut eleven by eight and a half inches. It is now ready for the printer. My image was easy. I captured it from a pattern I made but remember you only want to use your own copyright free images. You can also use ready prepared inkjet ready fabric.
 After printing I placed the fabric in the eCraft and cut out my design. The software that comes with the machine makes it so easy to place your design. This machine also works with "SCAL" and "MTC". I just love the ability to use programs to design and also the ability to use the eCraft's SD card library as well!
 The eCraft makes cutting fabric so easy.
 After cutting out all of my pieces I applied "heat-n-bond" to the back of my earring pieces so I could adhere them to each other.
 I decided to use a thread called "button hole twist" to connect the pieces. This thread is very tough and works quite well for hold. The most work believe it or not was pulling the paper off and sticking the two halves together. I mirror imaged the two so they would hang correctly.
 Once the pieces were placed together I punched the hole for the jump ring.


Thanks to my model!
Remember feel free to share comments, offer suggestions or ask questions. I want to have fun and want others to as well. Can't wait to see you next Tuesday!!
Well I love his design, so simple but so appealing. I love earrings and the bigger the better.His design was just the thing I needed for some over the top earrings! These are my light to wear Chandelier style Earrings! You too can have some just follow some easy directions.

I decided to use my Fundamentals 1 SD card which came with my eCraft for a design that would work! I love this heart design and saw right away that the cut out would work with the heart as a topper for my earrings.
You can use any design that works for you. I also made up an image to use on fabric which I used for this project. Lets get started!
The first thing is to prepare your fabric for inkjet printing. I use a product called Bubble Jet Set 2000. It makes fabric (natural fabrics do best)able to be used in an inkjet printer. The image will remain and not run off of your item. I soak the cotton fabric in the Bubble Jet Set solution for five minutes and then after it is dry, it is then ironed on freezer paper cut eleven by eight and a half inches. It is now ready for the printer. My image was easy. I captured it from a pattern I made but remember you only want to use your own copyright free images. You can also use ready prepared inkjet ready fabric.


I am so excited I can't wait to wear these. I also decided to make these have a shiny surface so I used I used "modge podge" like coating on them. I love using fabric and find that the weight of most large earrings makes my ears pull. It is not very attractive at all. These earrings are large, bold and light! What a fashion statement!! I love them and hope you will too!

Thanks to my model!
Remember feel free to share comments, offer suggestions or ask questions. I want to have fun and want others to as well. Can't wait to see you next Tuesday!!
Saturday, September 10, 2011
The Ecraft Winner is....
from Erika Valdez's hop page ~ Ruthie from September ninth. Congratulations!
I have a feeling that more is to come!!! Come on back to see what the future brings!
Thank you so much for participating!
Love 4 Stamps: Preliminary Winners from the Sewing Blog hop
Hey everyone I am so happy to announce that the preliminary winners from the sewing hop have been selected. Please stay tuned tonight at 4 pm CST the MAIN WINNER will be announced. The one and only who will receive the fabulous eCraft. ;)
In no particular order:
Denise O'Connor~ Rebecca Germain
ScrappyZeni Pradel~Christel Bonner Young.
Debi Tullier~Susan Ayers
KimberlyRae Patrick Forde~Carol E madoke@sc.rr.com
Crafty Sprouts~Amy E
Faith FreemanWinner~ Katrena
Rosa Ahrens~Jodi (no last name) jodimstanton@ gmail.com
Lyssa Beth Zimmerman~Sher @ ShersL84bed@ aol.com
Raven Baca~Crissy McEntire
Just to refresh from the last hop the winners were...
Raven Baca ~Amanda from prhmangel at gmail dot com
Carley Carter ~Jessica from the creative stamper spot
Debi Tullier ~Tammy tammy dot schmitt at mac dot com
Denise O'Connor ~ Jessica Kubit
Erika Valdez~Ruthie from September ninth
Lyssa Zimmerman~Jeannie Phillips
Faith Freeman ~michelegreen120 at gmail dot com
KimberlyRae Forde ~VinDeeLoo
Rosa Ahrens ~ Judy jejaeb@cfl.rr.com
Zeni Pradel ~Corylyn from Sweet Lil' Scrapper
All of these preliminary winners will be entered into the grand prize drawing. Please keep watching tonight at 4PM CST!!!! ;) Thank you all so much for hoping along with us.
Monday, September 5, 2011
Ecraft Sewing Blog Hop !
Welcome to the SEWING BLOG HOP! All of the fabulous designers on this hop are sharing their projects with you. These projects are designed to Celebrate Sewing Month. Each project is made using the Fabulous and versatile eCraft.
Here is my project for the hop!
I love sewing and the Ecraft machine makes embellishing fabric so easy! I love to use it for creating one of a kind gifts! I love using it to create quilt blocks and mug rugs.
My project for this hop is a wristlet! I know that monograms are so hot right now and I needed a bag of my very own! So here it is! I am celebrating Sewing as this is National Sewing Month! I am so excited about all of the wonderful projects that the eCraft is helping me make!
All of the participants of this hop, are using the amazing eCraft machine. It is created by CraftwellUSA.com. This company is really amazing, their customer service is fabulous and the products are top notch.
So Get Hopping!
Thanks for stopping! Your next blog is Denise O'Connor http://purplepaperparadise.blogspot.com/
Here is the Blog Hop Line Up~SEWING
Raven Baca http://love4stamps.blogspot.com/
Debi Tullier http://fabric-ecraft.blogspot.com/
Denise O'Connor http://purplepaperparadise.blogspot.com/
Erika Valdez http://www.craftysprouts.com/
Lyssa Zimmerman http://bornagaincrafter.blogspot.com/
Faith Freeman http://faithfulecreations.com/
KimberlyRae Forde http://kreationsbykimberlyrae.com/blog/
Rosa Ahrens www.for-micaela.blogspot.com
Zeni Pradel http://www.scrappyzeni.blogspot.com/
Craftwell USA http://ecraftbycraftwell.blogspot.com/
I decided to make a Monogrammed Wristlet this time! It was very easy but looks sharp!I am just excited to share how easy it is to cut fabric with an Ecraft machine. I love it so!
Here we go:
I chose my fabrics first. I needed four different ones for my project as well as a ten inch zipper. I also used fleece batting to make it quilted. I cut two pieces of fabric for the cover 9.5 by 9 inches, I also cut the same size for my batting and lining. I used a ten inch zipper. I also made a wrist loop for carrying it.
 It is also very important to press your fabric as well. It really makes your sewing look professional.

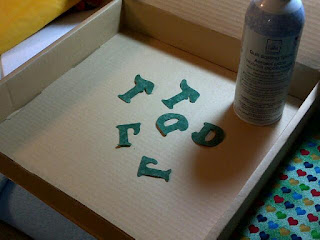
First I found that using my Ecraft was a joy to complete this project. I was able to produce sharp letters for my applique. I made two layers of my initials, so I could fray the shadow color. I love the effect. Well to begin with I used freezer paper and also "Heat-N-Bond" light to stabilize the fabric.


I decided to use temporary basting spray to place the letters on the cover so I could straight stitch them on my "bag".
I was able to place the letters on my cover and then straight stitch without fear of the letter moving.
 I am very pleased with the effect I achieved with my lettering!

I sewed two small tabs to the end of the zippers

I then sewed the cover to the zipper.
 I then made a "sandwich" of other fabrics so that they could be sewn and turned inside out quickly.
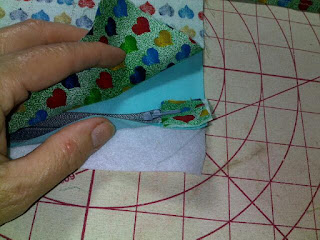
I then sewed around the outside, keeping a seam of the lining open so I could turn my bag right side out easily.
 I then clipped the corners and was able to turn the bag to its right side.
 I love the way the lettering turned out and took a chenille brush and frayed the shadow!


One last tidbit: I experimented with a piece of layered fabrics. I was able to cut them out and I can't wait to use this in a project!!!

I hope you enjoyed my project and would love to share my methods with you. I hope you feel free to leave comments. I would love to share my method with you!Please come back and see what else I have to offer you!

Good luck and keep on Hopping!
Here is my project for the hop!

I love sewing and the Ecraft machine makes embellishing fabric so easy! I love to use it for creating one of a kind gifts! I love using it to create quilt blocks and mug rugs.
My project for this hop is a wristlet! I know that monograms are so hot right now and I needed a bag of my very own! So here it is! I am celebrating Sewing as this is National Sewing Month! I am so excited about all of the wonderful projects that the eCraft is helping me make!
All of the participants of this hop, are using the amazing eCraft machine. It is created by CraftwellUSA.com. This company is really amazing, their customer service is fabulous and the products are top notch.
So Get Hopping!
Thanks for stopping! Your next blog is Denise O'Connor http://purplepaperparadise.blogspot.com/
Here is the Blog Hop Line Up~SEWING
Raven Baca http://love4stamps.blogspot.com/
Debi Tullier http://fabric-ecraft.blogspot.com/
Denise O'Connor http://purplepaperparadise.blogspot.com/
Erika Valdez http://www.craftysprouts.com/
Lyssa Zimmerman http://bornagaincrafter.blogspot.com/
Faith Freeman http://faithfulecreations.com/
KimberlyRae Forde http://kreationsbykimberlyrae.com/blog/
Rosa Ahrens www.for-micaela.blogspot.com
Zeni Pradel http://www.scrappyzeni.blogspot.com/
Craftwell USA http://ecraftbycraftwell.blogspot.com/
I decided to make a Monogrammed Wristlet this time! It was very easy but looks sharp!I am just excited to share how easy it is to cut fabric with an Ecraft machine. I love it so!
Here we go:
I chose my fabrics first. I needed four different ones for my project as well as a ten inch zipper. I also used fleece batting to make it quilted. I cut two pieces of fabric for the cover 9.5 by 9 inches, I also cut the same size for my batting and lining. I used a ten inch zipper. I also made a wrist loop for carrying it.


First I found that using my Ecraft was a joy to complete this project. I was able to produce sharp letters for my applique. I made two layers of my initials, so I could fray the shadow color. I love the effect. Well to begin with I used freezer paper and also "Heat-N-Bond" light to stabilize the fabric.


I decided to use temporary basting spray to place the letters on the cover so I could straight stitch them on my "bag".

I was able to place the letters on my cover and then straight stitch without fear of the letter moving.


I sewed two small tabs to the end of the zippers

I then sewed the cover to the zipper.


I then sewed around the outside, keeping a seam of the lining open so I could turn my bag right side out easily.


I hope you enjoyed my project and would love to share my methods with you. I hope you feel free to leave comments. I would love to share my method with you!Please come back and see what else I have to offer you!

Good luck and keep on Hopping!
Subscribe to:
Posts (Atom)