SVGcuts

Showing posts with label recycle. Show all posts

Tuesday, March 15, 2016

Incredible Egg Fun!


I love eggs…I clean the shells out if I am going to use them for baking or scrambling. I love the texture. I decided to create something a little different, a box made from an egg. I had to cut it in half it was fairly easy with a rotary grinder and a cut off wheel. I then used several of the products from AlteredPages including a Mailbox Muse stamp set.

Please let me know what you think of my crazy creation.


Supplies:
Egg Shell
Wood furniture biscuit from home improvement store
Muse Dragonfly Stamp
StazOn Jet Black Ink Pad
Trim  or Fiber 
German Scrap 
Glass Glitter 
Aileen’s Tacky Glue
Crystal Lacquer Mixing Mica
Straw
Marker Airbrush
Gold Sharpie
Tombow markers
Hot Glue


See you next month, Happy Spring!!


Tuesday, September 29, 2015

Evil Eye Piñata

Evil Eye Pinata


This is my Evil Eye Piñata. I am enamored with AlteredPages products. I also have always been inspired by the wonderful creative artists that make up AlteredPages and their Design Team. I never would have dreamed that I would become part of this great group. Let’s get started…


11864809_10206068272599372_526114609682950943_o

Supplies
Oatmeal box (round cardboard )
Paper Mache Cones
Aleene’s Tacky Glue (on hand)
hot glue and gun (on Hand)
Mod Podge
Assorted Cardstock
Splash Inks
Gelatos 
gesso
Bazzill Papers
acrylic paints
Sharpie markers
The Eyes have It Collage sheet
Pan Pastels
Silk Sari Ribbons
Dyeable  Seam Binding
Alcohol  for blending Sharpie ink on Seam binding.
Yarn for hanging


Here is my video offering:


Tuesday, July 28, 2015

Halloween Wreath for AlteredPages Design Team!

I am so excited about Halloween. I don’t really do much for the day but love to make fun stuff to enjoy it. I love using stuff that normally would have been thrown away. Yes my husband is always chiding me about my hoarder ways. I saw this “craft” paper packing and how to save it for something..It worked fabulously with this project. I want to remind all that there is no glue holding the paper to the wire. I used only the chalk paint to make it stay. It is very sturdy. I love all of the great supplies that AlteredPages has. These items help my imagination soar. I also found by using the little Pots I am more organized…FEAR, FEAR of organization…that really scares me. I hope you enjoy my post!

11659448_10205685032338605_530420501837339704_n


cl3wreath

Supply list:

Wire Hanger
Craft paper or newpaper cut into squares 5 x 5
Paper plate or tray for painting
Brushes (one for painting and a toothbrush for splattering)
Metallic paint (on hand)
gloves (optional)
Tacky glue (on hand)
Collage Sheets:
Scissors

Please visit  AlteredPages.com

Monday, June 16, 2014

Xyron Blog Hop!


Summer Fun Blog Hop! Hop along with Xyron and Craftwell!!!

xyronbloghopbanner
In order to enter the giveaway, you must leave a comment on all participating blogs and become followers of the Xyron. Please also like the Xyron FB page, you must 'like' Xyron to begin the hop.  and Craftwell blogs. If you  are already a follower then you  just need to leave a comment.  You  can comment once a day throughout the week.  A winner will be choosen at random from the comments left on the Craftwell blog, but will check to make sure all of the rules are followed. The comments will close at 12 midnight EST on Friday, June 20th.
Must be in the US or Canada to be eligible to win. The winner will be announced on Monday, June 23rd on the Craftwell blog.

Xyron Blog http://aintshecrafty.blogspot.com/
Yvonne Blair Blog:http://www.yvonneblair.com/
Jessica Kephart Blog http://www.homespunelegance.blogspot.com/
You are here : Debi Tullier: http://fabric-ecraft.blogspot.com/
Pam Bray: http://www.pammejoscrapbookflair.com/
Jazmin Gibbons: http://jazmin-rose.blogspot.com/
Liz Ortiz http://unikbyyes.blogspot.com/
Cheri Piles http://cherinspirations.com/blog/
Craftwell Blog: http://blog.craftwellusa.com/

Apologies to all my posts didn't upload  for some reason only the fourth of July card....I can't seem to get it to work....

For my Hop post I created a Fourth of July card. I love my eBosser, eBrush and Xyron adhesives! When I am creating with them all I consider it a triple threat!!!
10474483_10202852953379564_509788872_o
I simply love creating with all of my great tools. I started with my eBosser and used one of the Spellbinders M-Bossabilities Embossing Folders to create the wonderful patterns on my stars! I actually embossed them first then used my eBosser to cut them out! I used a silver stamp pad to make the design pop!
10474633_10202852778015180_1512361269_o (1)

10477751_10202852776615145_1946081553_o (1)
Next I used Pearl Paper for the card.  I prepared it with a fun “4” stamped on it. Then I used my eBrush to embellish it further.
10485291_10202852864777349_455273062_o

I wanted to apply the stars to my card and I love how my Xyron sticker maker handles any small piece that I put through it.
10439098_10202852852657046_351646084_o
I used my smaller Xyron machine to make my Ribbon stick to my project too!
10465853_10202852897858176_300406528_o
10457399_10202852860057231_82562951_o
Then it was time to put it all together. I do love how my project came out. I hope you enjoyed my tutorial. Best of luck to you with this great hop!
10425979_10202852954499592_1947792496_o


Thursday, February 6, 2014

Jeans are ripe for embellishing!

Jean Detail!!

I am so crazy for using fabric with my eBosser. I love pushing the envelope and seeing what I can do with my machine. So without much fuss I created a reverse applique in just a few minutes! It looks great and I can either leave it raw edged or sew down the edges.
This is super fun and just think you can have your favorite shape  added to your jeans or jean jacket. I suggest that you always test first on another item to practice first!
Supplies:
Craftwell eBosser
jeans (take a pair of old ones first)
fabric for the reverse applique
Heat’n Bond
Iron
steel ruled die (sizzix, accuquilt) your favorite one (use a smaller one though)
First apply the Heat’n Bond to the area that you are choosing to cut. I put the die inside of my pants leg and then smoothed the remaining fabric around it under the A Plate. I was able to use the C-Plate and then top with the A-Plate. The cut was smooth.
mole2
This is my first step applying the Heat’nBond to the back of the area that I am going to cut. I don’t iron long as it will absorb into the fabric if you hold to long.
1779544_10202029016821665_1419124293_n
Now this is just to show you after cutting the flourish out I ironed the focus fabric to the heat’n bond so it would show through. I just put the excess cut out on the piece to show you.
mole1
This is a photo of the light press I did to make sure I like how the pattern fell into the cutout. I really enjoyed making this.
Here is my finished pant leg. I can’t wait to wear these. I am very happy with my fancy pants!  I might add a little bling to them as well!
I hope all of you are well and that the cold subsides soon. I am so happy to think that spring might come one day!
best,
Debi

Saturday, November 23, 2013

Fun with Cheery Lynn Dies Part 1

Fun with Cheery Lynn Dies

Part 1

This is a two part project post as it requires a little more to give non-sewers options to make the finished product. I don’t want to spoil the reveal so I will tell you the method and techniques I used for the parts I made this week. You have to come back next week to see what the final project is…

I am so excited to do this so…

NO PEEKING

Camera 360

Well you can see by the photo that this is a recycling project and I will also share that it is a fabric project too! I am making another of those cool Steampunk items for my crazy relative. I decided to make my gift a super neat kind to the environment recycled project. I am using a two-liter soda bottle to make my special rings.

So here is the supply list:

a two liter soda bottle with the top and bottom cut off

I used a rubber band to roll the plastic very tight and left like this for several days.

Aluminum duct tape

Cheery Lyn Gear Die (LOVE THIS ONE)

B361__60783.1372691486.1280.1280

Craftwell eBosser

Sandwich:

A, B, C, D

Masking tape to transfer the tape to the plastic

A bone folder to smooth the tape

I first cut the Gear Die out of the aluminum tape . I love the sharp cut I get using the Craftwell eBosser.  I then place the masking tape over the metal tape after I weeded the unwanted parts off of the piece.

I cut the plastic from the two liter bottle to the size I wanted very close the the size of the aluminum tape’s width. I next transferred the design to the plastic. I used the bone folder to rub the design onto the plastic to secure it.

Camera 360

Now it is still a mystery project until the reveal next week but if you look closely you can see a special hint in the photo. There may be a pressing of fabric around. I am so excited and can’t wait to show you the second half. So while you wait can you venture a guess as to what I am making? Please leave a comment below for me! Have a great week and get ready for the second part next week.

Debi

Friday, May 18, 2012

Happy Mother’s Day to Me

Happy Mother’s Day to me!

Well this is certainly a change for me. I have always wanted a personal little book to carry around to record my thoughts. I know it sounds different but I love those little composition books. You know the ones..
051120123103
But I want pizazz and color and a neck ribbon with a pen attached. To much to ask for you might ask…NO! Not with my
CraftwellUSA eCraft we can make my dream come true..
Supplies:
  • CraftwellUSA’s  eCraft die cutting machine
  • cereal box chipboard
  • Fabric
  • Heat N Bond
  • Artificial Flower
  • Xyron Mega Runner
  • Extra Large RikRac from Plum Deals
  • Ribbon
  • Fimo Clay from JoAnn’s Fabrics
  • Fun Fun Fun
Here we go. I first cut my bookend shape from both the cereal box chipboard and my main fabric with the same shape. I used Heat N Bond on the fabric so I could attach it to the chipboard.
051120123101
051120123104
My eCraft cuts chipboard like a champ. I did use a pressure setting of 8 and multicut of 2 for the chipboard. I did not use a mat at all. The fabric cut with a pressure of 4 and again I did not use a mat.
I then cut a piece of fabric long enough to cover my little notebook.. I used enough to cover it from the inside seam to the other seam. I will carry this all the time. I have always wanted a little journal for quick thoughts.
051120123105
I used my iron to bond the fabric to the chipboard. It quickly bonded and I was ready to attach it to the exterior of my booklet, but first to make a pencil holder and closure to keep my booklet closed when not in use.
051120123107
I used extra large Rik Rac that I had gotten from “Pick Your Plum” a daily deal site. I love Rik Rac.
I cut three pieces large enough to hold a pencil and then placed two on one side the of holder, and one in the middle on the other side. When your pencil slides into the ric rac it locks the booklet closed. Xyron’s Mega Runner did a wonderful job of attaching my outside cover.
051120123112
I also cut a little “me” out of Fimo clay. You can cut this with the eCraft . The trick is to make a thin sheet and then bake it till it is almost done. I did use a die cutting machine for this project however.

051120123111 
Here she is ….Happy Mother’s Day to Me! and Belated to you too! I love making items with my CraftwellUSA’s eCraft Die Cutting Machine.  See you next week!

Thursday, April 26, 2012

Grandma’s Summer Fun Recycled Play

Grandma’s Summer Fun Using Recycled Drink Cylinder

This grandma is so excited about Summer coming.  Summertime means I will have my babies for a short time. My baby girl is  3 and half loves to craft with Granny! So I decided to help the environment and have fun with Rei too! So I am putting together crafting ideas for our vacation time together. I want this planet to be around and litter-less when my grands and their kids inherit this earth. So I am creating a fun way to get my Reilee to recycle and yet have a blast.
IMG_5319
So this is what we are starting with!
Supplies:
This is so super simple. I have provided the face piece files for either the eCraft Pro Software or the svg files for you! You will have to manual separate them and then cut them out. I love the ecraft as I can use scraps to make my small pieces.

IMG_5313
I used my Xyron’s Mega Runner to adhere the fun foam to my tea container. I also used the Mega Runner to attach my “hair” as well.
IMG_5314
For the smaller pieces I ran those thru my Xyron’s 1.5 Create-A-Sticker it is so easy and not messy at all. I love the all over coverage!
IMG_5315
Here you can see my individual face pieces ready to be placed. This is so easy and I know that Rei will have a blast. I can’t wait to make accessories for them too! I can see bows, masks, and even party hats made for our special container!
IMG_5320
and here I am the Grandma recycled instant tea container! Are my ears really that big…LOL! Ready for a night on the town with my puzzle earrings. I just hope that my little grand-daughter has fun playing with me and making her own storage person. Yes you can put your “stuff” still in the container!
IMG_5318
I wish all of you joy for every day of your life! I hope that you have many special days and that my everyday  will  remain just that a special day.
See you next week, Debi

Thursday, April 12, 2012

Easter Blooming Recycling Project

Recycling Fun and Spring Flowers!

I love Spring, but I have not known its merits long. I had lived all of my life with virtually no season changes. We laughed and said that we only had two seasons hot and hotter. But I recently have had the pleasure of seeing the seasons change first hand and I love it. I love seeing the green appear from the brown remains of winter.Seasons do reflect life’s journey in such a way that I have now realized so much. I love seeing the daffodils rise up and show their beautiful faces. The Iris, azalea, dogwood, and numerous blooms how breathtaking they are. So to give back to Mom Nature and to keep several plastic bottles out of the landfill I designed this project. I will show you how I made them into Easter or Spring gifts that I hope will bring smiles.
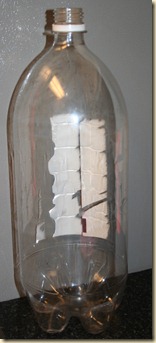
bottle

We all know the unloved plastic soda bottle. Well I used my craft knife and cut the bottom off about five inches from the bottom. By the way I use the top for my gardening funnel. You can use this to make bands for any plant pot, container, or even a glass. It is easy and doesn’t require a lot of work , yet the outcome is very pretty.

Now we are ready to get started.


Supplies and Settings

  • one 2 liter soda bottle cut  in half
  • craft knife
  • quilting weight cotton fabric from JoAnn's Fabrics
  • Beautiful Fabric from a mystery giver used for eggs..
  • stitch witchery or straight stitch sewing machine
  • Bias tape of your choice any fabric store or you can make your own
  • eCraftshop Pro Software for manipulating images
  • eCraft Die Cutting Machine
  • veggie chopping mat from DollarTree
  • 606 Spray and Fix Fusible Adhesive from Walmart

  • Svg File of Chocolate bunny from Oh My Crafts..
  • Svg of Egg made from shape file in eCraft Pro Software
  • Iron on Crystals and application tool  from Kandi Kane
  • Hook and Loop tape for closure from Walmart


After cutting my bottle, I next brought my image svg into my eCraftshop Pro software. It is so easy to use to make multiple images.  I sent these on to my machine and the cut out was very nice.

IMG_5086

Settings for eCraft machine pressure is only 4.5 and no tabs. I used the veggie mat sprayed till it was very sticky and used a brayer to make sure the material was well stuck. I can cut plain fabric (cotton quilting weight) using this method.

cut

It cuts so very cleanly. I actually used my leftover and made more. you can see the clean cut in front of the cutter’s trolley.  Love this.

bunI

Check out all of my Chocolate Bunnies…non caloric. but they are soooo SWEET!!!

IMG_5176

Next I cut a rectangle of pink fabric two inches longer than the circumference of my bottle. I cut it four inches wide. I pressed under a quarter inch on both edges. Next I used a contrasting bias tape to put on the edge of my pot band. I made mine but you can buy it at any fabric store. You can use stitch witchery to attach it to the band. I used my sewing machine but either way works fine.

IMG_5177 

I received this beautiful fabric strip from a mystery person. I love it and used it to make some sweet Easter eggs for my bands. I have plenty left for more projects.
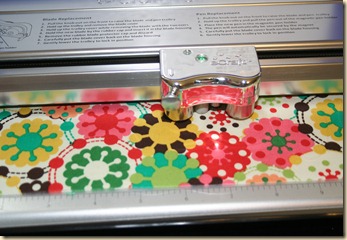
egg

Next I used my Heat n Bond to attach my bunnies and eggs to my bands. I also used hook and loop tape on the ends to fasten the band around the “pot” or vase. I used my Ranger Stickles and iron on crystals to embellish my Easter egg and rabbits.

band

One last note, I purchased the water crystals at the DollarTree store.  You will see a bounty of blooms from my yard. I am blessed with so many beautiful flowers. I love the Wisteria, and Bridal Wreath, I love the exotic pink honeysuckle. So much to be thankful for. I love the rebirth that Spring gives us. Life is such a wonderful gift!
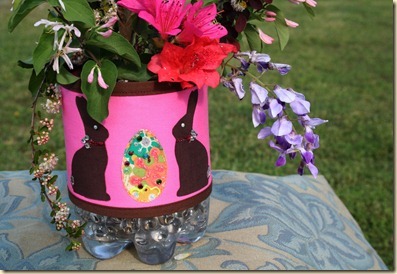
new

One big purple bearded Iris and some beautiful foliage finish out my Spring Chocolate Bunny Band flower container. I am making several for friends so they too can enjoy and be “green” too!

next

I hope you enjoy my flowers!

pro

Next week I will share another recycling project. This is so important to me, I pride myself on my saving and using stuff over and over again in new ways.

Happy Easter and Happy Spring to all!

Debi