Thursday, February 20, 2014
February is a Month for Love!
Saturday, November 23, 2013
Fun with Cheery Lynn Dies Part 1
Fun with Cheery Lynn Dies
Part 1
This is a two part project post as it requires a little more to give non-sewers options to make the finished product. I don’t want to spoil the reveal so I will tell you the method and techniques I used for the parts I made this week. You have to come back next week to see what the final project is…
I am so excited to do this so…
NO PEEKING
Well you can see by the photo that this is a recycling project and I will also share that it is a fabric project too! I am making another of those cool Steampunk items for my crazy relative. I decided to make my gift a super neat kind to the environment recycled project. I am using a two-liter soda bottle to make my special rings.
So here is the supply list:
a two liter soda bottle with the top and bottom cut off
I used a rubber band to roll the plastic very tight and left like this for several days.
Aluminum duct tape
Cheery Lyn Gear Die (LOVE THIS ONE)
Craftwell eBosser
Sandwich:
A, B, C, D
Masking tape to transfer the tape to the plastic
A bone folder to smooth the tape
I first cut the Gear Die out of the aluminum tape . I love the sharp cut I get using the Craftwell eBosser. I then place the masking tape over the metal tape after I weeded the unwanted parts off of the piece.
I cut the plastic from the two liter bottle to the size I wanted very close the the size of the aluminum tape’s width. I next transferred the design to the plastic. I used the bone folder to rub the design onto the plastic to secure it.
Now it is still a mystery project until the reveal next week but if you look closely you can see a special hint in the photo. There may be a pressing of fabric around. I am so excited and can’t wait to show you the second half. So while you wait can you venture a guess as to what I am making? Please leave a comment below for me! Have a great week and get ready for the second part next week.
Debi
Thursday, August 2, 2012
Trains, Trains, Trains!
Hobbies, Hobbies, Hobbies!
Thursday, June 7, 2012
Vacation “SmasH” Book
Initial Shaped Book to Treasure
- Cereal box chipboard
- Craftwell Ecraft Die Cutting Machine
- light weight cotton fabric from JoAnn’s Fabrics
- Several Sheets of solid colored cardstock
- Signify Pink’s Glimpses “Life is a Party” paper and embellishment set
- Sewing machine optional
- xyron 5 inch stamp creator or adhesive of your choice.
If they don't have a wholesale account, there's a place to request it and we do it pretty quickly.
They can look at the retail site, just to see the product though – www.glimpsesbysignifypink.com I just love their wild and bright colors. They make my projects just jump to life.
Friday, May 18, 2012
Happy Mother’s Day to Me
Happy Mother’s Day to me!
CraftwellUSA eCraft we can make my dream come true..
- CraftwellUSA’s eCraft die cutting machine
- cereal box chipboard
- Fabric
- Heat N Bond
- Artificial Flower
- Xyron Mega Runner
- Extra Large RikRac from Plum Deals
- Ribbon
- Fimo Clay from JoAnn’s Fabrics
- Fun Fun Fun
Thursday, April 26, 2012
Grandma’s Summer Fun Recycled Play
Grandma’s Summer Fun Using Recycled Drink Cylinder
- CraftwellUSA’s eCraft die cutting machine
- eCraft Pro Software
- my face design file (gift to you!)
- Xyron’s Mega Runner (LOVE THIS)
- Xyron’s 1.5 Create-A-Sticker machine (LOVE TOO) from Walmart
- Card Stock - eCraft Diecutable Cardstock from The PaperMill Store
- puzzle piece earrings from http://fabric-ecraft.blogspot.com/2012/03/puzzling-gift-idea.html
- any tea, lemonade or grits empty storage box will work.
- fun foam for wrapping the container from JoAnn's Fabrics
Thursday, April 12, 2012
Easter Blooming Recycling Project
Recycling Fun and Spring Flowers!
I love Spring, but I have not known its merits long. I had lived all of my life with virtually no season changes. We laughed and said that we only had two seasons hot and hotter. But I recently have had the pleasure of seeing the seasons change first hand and I love it. I love seeing the green appear from the brown remains of winter.Seasons do reflect life’s journey in such a way that I have now realized so much. I love seeing the daffodils rise up and show their beautiful faces. The Iris, azalea, dogwood, and numerous blooms how breathtaking they are. So to give back to Mom Nature and to keep several plastic bottles out of the landfill I designed this project. I will show you how I made them into Easter or Spring gifts that I hope will bring smiles.
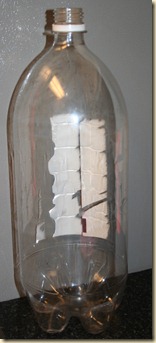
We all know the unloved plastic soda bottle. Well I used my craft knife and cut the bottom off about five inches from the bottom. By the way I use the top for my gardening funnel. You can use this to make bands for any plant pot, container, or even a glass. It is easy and doesn’t require a lot of work , yet the outcome is very pretty.
Now we are ready to get started.
Supplies and Settings
- one 2 liter soda bottle cut in half
- craft knife
- quilting weight cotton fabric from JoAnn's Fabrics
- Beautiful Fabric from a mystery giver used for eggs..
- stitch witchery or straight stitch sewing machine
- Bias tape of your choice any fabric store or you can make your own
- eCraftshop Pro Software for manipulating images
- eCraft Die Cutting Machine
- veggie chopping mat from DollarTree
-
606 Spray and Fix Fusible Adhesive from Walmart
- Svg File of Chocolate bunny from Oh My Crafts..
- Svg of Egg made from shape file in eCraft Pro Software
- Ranger Stickles from Oh My Crafts..
- Iron on Crystals and application tool from Kandi Kane
- Hook and Loop tape for closure from Walmart
After cutting my bottle, I next brought my image svg into my eCraftshop Pro software. It is so easy to use to make multiple images. I sent these on to my machine and the cut out was very nice.
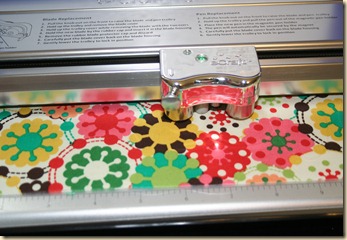
Settings for eCraft machine pressure is only 4.5 and no tabs. I used the veggie mat sprayed till it was very sticky and used a brayer to make sure the material was well stuck. I can cut plain fabric (cotton quilting weight) using this method.
It cuts so very cleanly. I actually used my leftover and made more. you can see the clean cut in front of the cutter’s trolley. Love this.
Check out all of my Chocolate Bunnies…non caloric. but they are soooo SWEET!!!
Next I cut a rectangle of pink fabric two inches longer than the circumference of my bottle. I cut it four inches wide. I pressed under a quarter inch on both edges. Next I used a contrasting bias tape to put on the edge of my pot band. I made mine but you can buy it at any fabric store. You can use stitch witchery to attach it to the band. I used my sewing machine but either way works fine.
I received this beautiful fabric strip from a mystery person. I love it and used it to make some sweet Easter eggs for my bands. I have plenty left for more projects.
Next I used my Heat n Bond to attach my bunnies and eggs to my bands. I also used hook and loop tape on the ends to fasten the band around the “pot” or vase. I used my Ranger Stickles and iron on crystals to embellish my Easter egg and rabbits.
One last note, I purchased the water crystals at the DollarTree store. You will see a bounty of blooms from my yard. I am blessed with so many beautiful flowers. I love the Wisteria, and Bridal Wreath, I love the exotic pink honeysuckle. So much to be thankful for. I love the rebirth that Spring gives us. Life is such a wonderful gift!
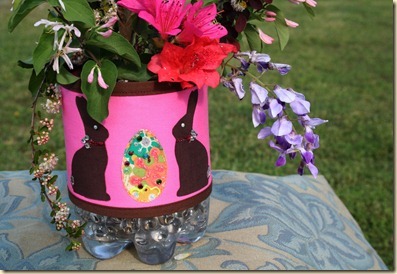
One big purple bearded Iris and some beautiful foliage finish out my Spring Chocolate Bunny Band flower container. I am making several for friends so they too can enjoy and be “green” too!
I hope you enjoy my flowers!
Next week I will share another recycling project. This is so important to me, I pride myself on my saving and using stuff over and over again in new ways.
Happy Easter and Happy Spring to all!
Debi
Thursday, March 15, 2012
Bunny is Coming!
The Bunny is Coming!
I know that I am a Bake 'N Shrink fiend. I love this stuff, I can’t help but find reasons to make fun things with it. I was thinking about a different gift for my Grand-daughter and a carrot necklace for Easter came hopping into my mind.
I know that she will love it as we all love our Carets….OOOPS wrong one. Well we do love Carrots as well. She will love this little Monogrammed Carrot pendant. The Bunny also says it it very light to hop around with!
Supplies:
- Bake ‘N Shrink from Printonit.com
- Carrot shaped svg (not sure where it is from)
- Jewelry findings from JoAnn's Fabrics
- Ranger Melting Pot from Blitsy.com
- Ranger Melt Art : ULTRA THICK EMBOSSING ENAMEL from Blitsy.com
- CraftwellUSA’s Die Cutting System
- Prismacolor Markers from Dick Blick
- Colorboxx inks from Hobby Lobby
- Ribbon from JoAnn's Fabrics
- Initial Stamps from Hobby Lobby
A very easy project. I first cut the Bake’N Shrink out with my eCraft cutter. It really does cut nicely with the ecraft machine.
I then quickly took my Prismacolor markers and shaded my “carrot” I used the cute letter stamps to personalize the carrot. I am such a big kid when it comes to shrink it. I love to watch it bend and twist and then shrink and turn flat again.
Once I finished shrinking it I decided it needed a very shiny finish. I have just received my Ranger’s Melting Pot and put some of the UTEE into it. It melted almost instantly. I placed the pendant into the liquid UTEE and voile! there it was a mirror glaze on my cute pendant. I held it over the pot until it was dry and not dripping. I love the way it looks and feels, more importantly I can’t wait for my Grand-daughter to open the “egg” which contains it to see her beautiful face light up.
Happy Spring it is Sprung!!!
Much more to come!
Hugs to all, Debi
Thursday, March 1, 2012
Brag Bag
So many times I have a need for a zippered bag. So many times I reach for photos of my sweet babies so this little project brings both together! I am in Love!!!
I have found products that allow me to customize my sweet little bag and really create a sweet memory and brag bag!!! By the way if you are not a sewer you can still use my favorite products to create your own brag bag. Very simple purchase a ready made cloth zippered bag. See them often in the school supply area.
Lets get started….
SUPPLIES
- Craftwell eCraft Die Cutting system
- Basic shape files for cutting zipper pulls
- a 9.5 by 13.5 inch piece of a cotton type fabric from JoAnn's Fabrics
- one plastic zipper from JoAnn's Fabrics
- pins from JoAnn's Fabrics
- thread from JoAnn's Fabrics
- at least a straight stitch sewing machine from JoAnn's Fabrics
or
- a zippered premade pouch
- a digital photo and an ink jet printer for printing on transfer
- Zap Heat Gun
- Berol Prismacolor markers from Hobby Lobby
- hole punch from Hobby Lobby
- Bake & Shrink (this is the most wonderful item, it makes a fabulous result)
- Inkjet Opaque Print & Cut (this is a way to transfer your images to dark fabric) LOVE IT…
The project was really quite easy. I first decided on the photo that I wanted to use. I used a photo editor to size it and add a frame to it. I then printed it out. I quickly cut it out with my eCraft as a rectangle shape very fast and easy. I used #1 pressure and not tabs. I used the film side up, and basically kiss cut it.
To apply to fabric you set your iron to cotton setting and then place a piece of parchment paper and then iron gently for 20 seconds and then with firm pressure again for another 20 seconds. Wait till cool to take the parchment paper off.
Zipper installation is easy too. (it really is) Just lay face down like in above photo. Sew on the upper edge, Then fold fabric in half and place zipper on other side and sew it. Turn inside out and then the next step is to sew the sides. I use a plastic zipper so that I can sew thru it. I sew on the inside of the zipper in the front of the metal clip (DO NOT SEW WILL BREAK NEEDLE IF YOU RUN OVER METAL) over the plastic teeth. Then I clip off the extra zipper material. Will post a link later for sewing the zipper.
Next I used my eCraft to cut out the Bake and Shrink. I love this stuff not like the shrinking film but more like a thin clay type of result when shrunk. I love it, it is my new favorite thing. I can do so much with it. It cut out using #6 pressure and I did tape it to a sheet of 12 x 12 cardstock so it would not move sideways. I colored it with stamps and Berol Prismacolor markers. and then I took the plunge..
it is a little over 2 inches here..
first time I did this I was so scared it would get stuck…
then it relaxed..
see the size reduction about 3/4 shrinkage. You can also mold it to shape while hot.
I love this stuff…
Now when I am with my friends and want to brag a little…..I got my bag!!!
I love having fun with you! Wait till next week I have some Jeweled ideas to share with you!